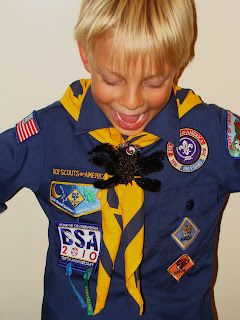
 Ugh. Gum balls. Generally detested by those unfortunate enough to have a Gum tree in their yard. But last night these annoying little seed carriers got a creepy Halloween makeover at our Cub Scout den meeting!
Halloween means many things to many people, and some parents may not appreciate crafts involving witches, skeletons or monsters, so this creepy looking spider is something that can be universally enjoyed by all the boys and parents. After all, what boy doens't like bugs and spiders?
I can't take full credit for this craft idea, I did see it somewhere else but for the life of me can't remember where. Just something that stuck with me in one of my many late night web surfing marathons. Without the ring they are a neat decoration to put on a table or in those fake cobwebs that are so popular for spooky home decorating. But I decided that this craft would make an awesome Halloween themed neckerchief slide, and I think it went over quite well with the boys!
New! Scroll to bottom for printable directions...
Step One: Go to your backyard or local park and spend 30 minutes bent over with a plastic bag looking for the narliest, spikiest gum balls you can find. You will need 2 balls for each child or decoration you are making. Add three bonus points if you get your kids to help on the hunt, add two bonus points if your kids are outside playing while you are hunting, add 5 bonus points if you stay outside to enjoy the fall weather even after you've collected enough gum balls for your craft. Oh, you didn't know we were playing a game? Silly me, perhaps you should be...
Step Two: Use hot glue to glue two balls together. Because of the spikes, this may take a lot of glue. Let set before going to next step.
Step Three: This is optional, but I liked the effect. Take the glued sets of gum balls outside and spray paint them black or whatever color you are making your decorations. Other fun choices would be a spooky purple, ugly green, or Halloween orange. Take a short walk around the neighborhood to look at the chaning leaves while you wait for the paint to dry.
Step Four: This is the remaining prep work to do before the meeting if you are making a Cub craft. You'll need a bunch of chenille stems, the type that has four puffy sections per stem. For my craft I used black so we'd all look the same, but feel free to use other festive colors. These you will cut up between each fluffy section. You will need 6-8 of these pieces per spider, so plan your purchase accordingly. If you are turning the decorations into a Cub neckerchief slide, you will also need some regular straight chenille stems (pipe cleaners). Cut those in half and make into circles about the size of two fingers by twisting the ends together.
Step Five: Give each boy a set of glued gum balls, 6-8 cut chenille fluffy pieces (we used six to save money and supplies, even though its not authenticly arachnid), and a circle shaped piece if you are making slides. Also put out a container of assorted googly eyes. I used two on mine but some of the boy's spiders ended up with odd numbers of eyes and look all the better for it!
Step Six: Let the boys figure out which way their spider will look best, then find holes on the sides of the balls where the seeds were. Put a dot of craft glue in the hole and push in a puffy stem to form a spider leg. Do this a few more times on each side. Bend the legs so they look spider-ish. Glue on eyes towards the top and the chenille ring to the back (if using). We found the craft glue didn't work so well on this part, so each kid brought their creation up to an adult who was manning a hot glue gun and instructed her where to put the pieces.
Let dry and they're ready to wear! Since this was one of our early Wolf den meetings, we left the spiders on the tables and went outside to practice flag folding and flag cerem
Below is the supply list for 10 spider creature slides. If you make this creation yourself, please let me know how it turns out or send me a picture! I'd love to see other scary critters!
Spider Slides (makes 10)
20 large prickly gum balls
5 regular chenille stems (pipe cleaners), black or color of your choice
15 chenille stems with the four fluffy parts (or 20 if doing 8 legs)
Package of assorted small googly eyes
Hot glue
Craft ("Tacky") glue
Spray paint - OPTIONAL
(Free Adobe Acrobat Reader required for viewing)
Happy Halloween!

Hi Melody,
ReplyDeleteWhat a cute little nature craft! We don't have gum balls here in CT, but I remember them from my days of living in Virginia. Thanks for stopping by my blog at www.kidsdiscovernature.com and welcome to the effort to get kids outside!
Ha, well there are probably a lot of Virginians that would LOVE to send some gum balls your way! Thanks for stopping by!
ReplyDelete